M
Maya Chen
Guest
- Thread Author
- #1
Apartment worm composting turns kitchen scraps into free fertilizer with no smell and no yard. Here’s how to start worm bin composting indoors without bugs.
I’ve kept a bin under my kitchen sink in a zone 6b apartment for six years. Guests have never noticed it. This guide covers exactly what I’d do if I were starting over today.
Vermicomposting [composting with worms] needs no yard, no turning, and no hot pile. A bin that fits under your sink handles a couple of people’s daily scraps and turns them into dark, crumbly castings.
That makes apartment composting realistic for almost anyone, and it fits neatly into small space gardening. Your houseplants get free fertilizer, and your trash stops smelling like old banana peels.
New to growing in tight quarters? Start with this beginner’s guide to apartment gardening, then come back here.
Your setup comes down to two choices: which bin system fits your budget, and where it can live.
Totes trap moisture, so drill ventilation holes near the top and keep the lid snug. Trays let extra liquid drain into a bottom reservoir, which you empty every week or two.
Worms are light-sensitive, so a dark spot keeps them down in the bedding and out of sight. A stable temperature matters more than the exact spot. Heat kills worms faster than cold slows them.
Here’s the shopping list for a healthy, odor-free system. You probably own half of it already.
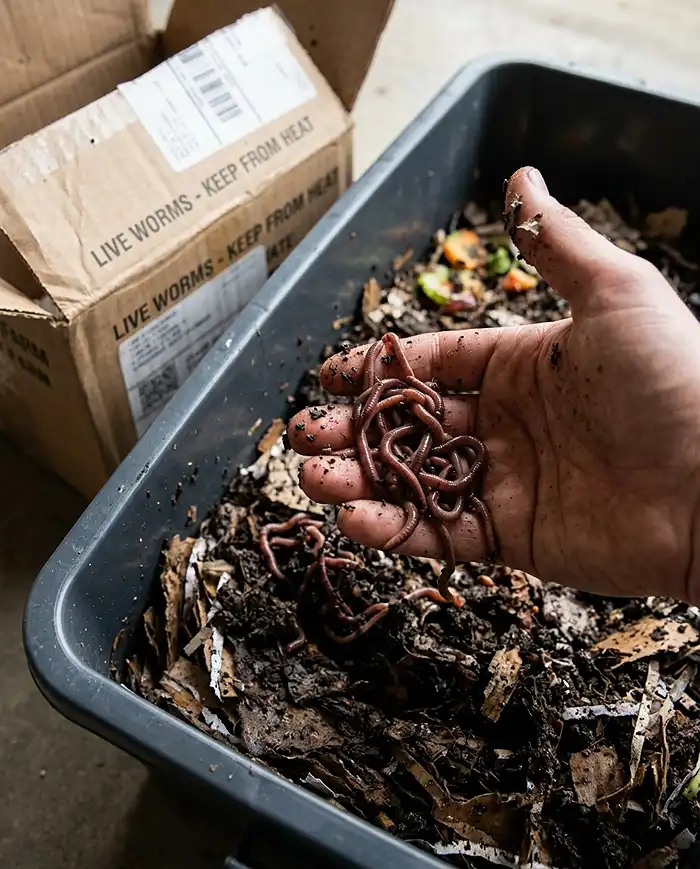
Red wigglers naturally live in leaf piles and manure, so they eat surface food and reproduce fast. A worm dug from your yard will try to burrow out or die. Skip bait-shop worms too, since many are other species.
Start with half a pound for a small tote or one pound for a larger bin. That’s about 1,000 worms per pound. As of 2026, prices often land around $35 to $50 per pound from reputable sellers.
The University of Idaho Extension vermicomposting guide backs up both the species choice and the worm count.
The whole setup takes about 45 minutes. Work in order: moisten the bedding, add the worms, then feed lightly.
Fluff the bedding loosely into the bin. Packed bedding suffocates worms and breeds anaerobic [oxygen-free] sludge that stinks. If water streams out when you squeeze a handful, mix in dry shreds.
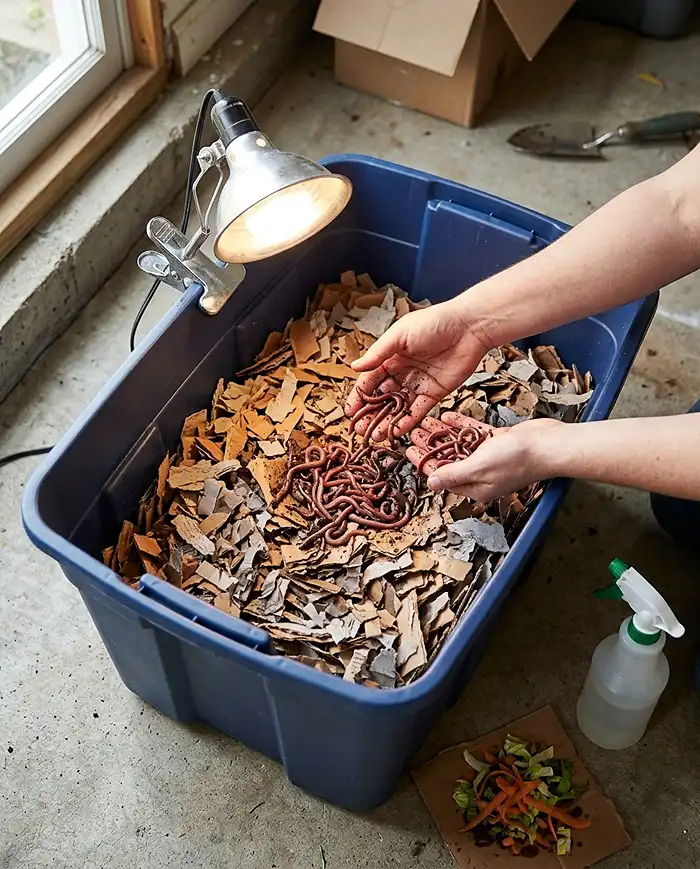
Lay the worms gently on top of the damp bedding rather than dumping them in a clump. Leave the bin open under a bright light for a few hours. They’ll burrow down to escape it.
Once most have disappeared, nudge any stragglers down and put the lid on. Then leave them alone for the evening.
Add only a small handful of scraps (about 1/4 cup) on day one, buried under the bedding. Then wait.
Worms need about a week to settle in, and the bedding feeds them in the meantime. Add more only when the first batch is mostly gone.
Once your worms settle in, upkeep takes about five minutes a week. An established pound of worms can process roughly 3 to 5 pounds of scraps weekly, and the colony grows as it eats. Your weekly routine:
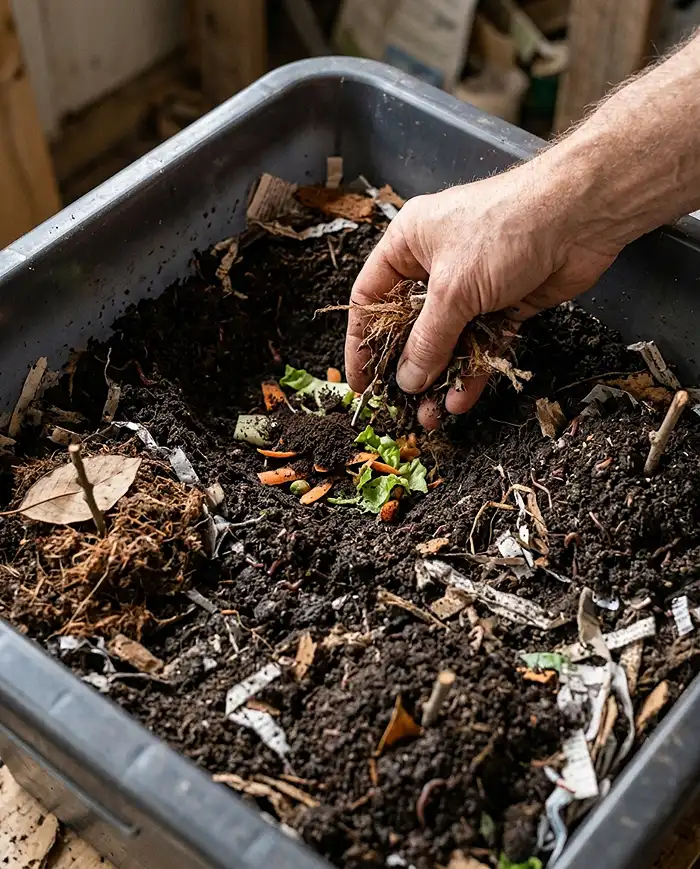
Chop scraps small, since smaller pieces break down faster. Pull back the bedding, add the scraps, and cover them completely. Next feeding, use a new corner. By the fourth corner, the first should be nearly empty.
After three to six months, the bedding turns dark and crumbly, with few recognizable scraps. That’s finished compost. Harvest when about two-thirds of the bin has transformed.
Mix castings into potting mix at roughly 1 part to 4 parts for compost for containers. You can also top-dress pots with a thin layer, especially if you’re planning balcony garden ideas with lots of planters.
Almost every worm bin problem traces back to too much food or too much moisture. Here are the three issues apartment composters run into most.
Overfeeding tops the list of common apartment gardening mistakes for beginners too. When in doubt, feed less.
Fill a small jar with an inch of apple cider vinegar and a drop of dish soap. Cover it with plastic wrap poked with small holes. Flies get in but can’t get out.
Fungus gnats [tiny dark flying pests] come from overly wet bedding. Add dry shreds and the trap handles the rest.
A few worms exploring the walls the first night or two is normal. A mass exodus is different and signals acidic, soggy, or toxic conditions.
Stop feeding citrus or anything acidic, sprinkle in a handful of crushed eggshells, and leave a light on over the open bin. The light pushes worms back down. Check moisture too.
No. A healthy, properly maintained worm bin smells like a forest floor after spring rain. Garbage smells mean overfeeding, too much moisture, or banned foods like meat and dairy. Fix it by pausing feeding and adding dry shredded paper.
A brand-new bin typically takes 3 to 6 months to produce a harvestable amount of finished compost. Starting with more worms and chopping scraps small speeds things up.
Yes. Established worm bins handle 2 to 3 weeks alone. Before leaving, feed a slightly larger portion buried under bedding and add extra damp bedding on top. Keep the bin in its cool, dark spot.
Start with half a pound of red wigglers for a small tote or one pound for a larger bin. A pound is about 1,000 worms and can process roughly 3 to 5 pounds of scraps weekly once established.
No. Feed every few days, only when the last batch is mostly gone. Overfeeding causes more problems than underfeeding. In a brand-new bin, wait about a week between the first feedings.
Apartment worm composting is quieter, cheaper, and easier than most people expect. Set up the bin right, feed lightly, and the worms do the rest.
I’ve kept a bin under my kitchen sink in a zone 6b apartment for six years. Guests have never noticed it. This guide covers exactly what I’d do if I were starting over today.
Table of Contents
- The Magic of Vermicomposting in Small Urban Spaces
- Planning Your Apartment Worm Composting Setup
- Essential Supplies for Indoor Worm Composting
- Step-by-Step Guide to Starting Your Worm Bin
- Feeding and Maintaining Your Indoor Worm Farm
- Harvesting Worm Castings for Your Houseplants
- Common Problems & Solutions
- Frequently Asked Questions
- Final Thoughts and Key Takeaways
The Magic of Vermicomposting in Small Urban Spaces
Vermicomposting [composting with worms] needs no yard, no turning, and no hot pile. A bin that fits under your sink handles a couple of people’s daily scraps and turns them into dark, crumbly castings.
That makes apartment composting realistic for almost anyone, and it fits neatly into small space gardening. Your houseplants get free fertilizer, and your trash stops smelling like old banana peels.
New to growing in tight quarters? Start with this beginner’s guide to apartment gardening, then come back here.
Planning Your Apartment Worm Composting Setup
Your setup comes down to two choices: which bin system fits your budget, and where it can live.
Choosing the Right Bin System (Totes vs. Stackable Trays)
Quick Answer: Plastic totes are the cheapest way to start, while stackable trays make harvesting easier. A 10 to 18-gallon opaque tote suits one or two people. Pick trays if you don’t want to sort worms by hand.
| System | Best For | Watch Out For |
|---|---|---|
| DIY plastic tote | Tight budgets and first-timers | Traps moisture, so you must drill ventilation holes |
| Stackable trays | Easy harvesting and a tidy look | Higher upfront cost, and upper trays can dry out |
Totes trap moisture, so drill ventilation holes near the top and keep the lid snug. Trays let extra liquid drain into a bottom reservoir, which you empty every week or two.
Location: Temperature and Darkness Requirements
Quick Answer: Red wigglers thrive in darkness between 55°F and 77°F (13°C-25°C). Under the kitchen sink, in a closet, or in a pantry all work. Avoid radiators, sunny windows, and drafty entryways.
Worms are light-sensitive, so a dark spot keeps them down in the bedding and out of sight. A stable temperature matters more than the exact spot. Heat kills worms faster than cold slows them.
Real Example: My first winter, I parked the bin beside a radiator. Within two weeks the bedding hit 82°F, and I lost roughly a third of my 500 worms before I moved it to a closet.
Essential Supplies for Indoor Worm Composting
Here’s the shopping list for a healthy, odor-free system. You probably own half of it already.
- Bin: a 10 to 18-gallon opaque tote with a lid, or a stackable tray set
- Worms: half a pound to one pound of red wigglers
- Bedding: plain cardboard, newspaper, or coconut coir
- Tools: a drill with a small bit, a spray bottle, and a fork for fluffing
Sourcing the Right Worms: The Mighty Red Wiggler
Quick Answer: Eisenia fetida, the red wiggler, is the only worm you should put in an indoor bin. Garden earthworms and nightcrawlers live deep in soil and won’t survive a shallow bin. Buy from an established worm farm.
Red wigglers naturally live in leaf piles and manure, so they eat surface food and reproduce fast. A worm dug from your yard will try to burrow out or die. Skip bait-shop worms too, since many are other species.
Start with half a pound for a small tote or one pound for a larger bin. That’s about 1,000 worms per pound. As of 2026, prices often land around $35 to $50 per pound from reputable sellers.
The University of Idaho Extension vermicomposting guide backs up both the species choice and the worm count.
Preparing the Perfect Carbon Bedding
Quick Answer: Carbon bedding is shredded, damp, brown material like plain cardboard, newspaper, or coconut coir. It balances the nitrogen in food scraps and keeps the bin from turning soggy. Fill the bin 6 to 8 inches deep.
- Plain cardboard: peel off tape and labels, then shred into 1-inch strips
- Newspaper: black-and-white ink only, torn into strips
- Coconut coir: expand a dry brick in warm water first
- Dry fall leaves: free and great, as long as they’re pesticide-free
Step-by-Step Guide to Starting Your Worm Bin
The whole setup takes about 45 minutes. Work in order: moisten the bedding, add the worms, then feed lightly.
Step 1: Prepping and Moistening the Bedding
Quick Answer: Soak shredded cardboard for 10 minutes, then squeeze it until only a few drops fall. It should feel like a wrung-out sponge.
Fluff the bedding loosely into the bin. Packed bedding suffocates worms and breeds anaerobic [oxygen-free] sludge that stinks. If water streams out when you squeeze a handful, mix in dry shreds.
Step 2: Introducing the Worms to Their New Home
Lay the worms gently on top of the damp bedding rather than dumping them in a clump. Leave the bin open under a bright light for a few hours. They’ll burrow down to escape it.
Once most have disappeared, nudge any stragglers down and put the lid on. Then leave them alone for the evening.
Step 3: The First Feeding and the Waiting Period
Add only a small handful of scraps (about 1/4 cup) on day one, buried under the bedding. Then wait.
Worms need about a week to settle in, and the bedding feeds them in the meantime. Add more only when the first batch is mostly gone.
Feeding and Maintaining Your Indoor Worm Farm
Once your worms settle in, upkeep takes about five minutes a week. An established pound of worms can process roughly 3 to 5 pounds of scraps weekly, and the colony grows as it eats. Your weekly routine:
- Check moisture: bedding should stay wrung-out-sponge damp
- Feed only when the last batch is mostly gone
- Fluff the bedding gently with a fork to add air
- Empty the drip tray if you use one
The Green and Red Lists: What to Feed (and Avoid)
Quick Answer: Feed coffee grounds, melon rinds, and leafy greens. Never feed citrus, onions, meat, dairy, or oils. The banned foods rot fast, turn acidic, or attract pests, and they cause nearly every odor complaint.
| Green List (Feed) | Red List (Avoid) | Why It’s Banned |
|---|---|---|
| Coffee grounds and paper filters | Citrus peels | Too acidic, so worms flee |
| Melon rinds and banana peels | Onions and garlic | Strong smell, irritates worms |
| Leafy greens and veggie trimmings | Meat, fish, and bones | Rots fast, attracts flies and rodents |
| Crushed eggshells and plain tea bags | Dairy and oils | Turns rancid, causes odor |
The Pocket Feeding Technique
Quick Answer: Pocket feeding means burying scraps in one corner under 2 inches of bedding, then using a different corner each time. It prevents fruit flies and shows you exactly how fast your worms eat.
Chop scraps small, since smaller pieces break down faster. Pull back the bedding, add the scraps, and cover them completely. Next feeding, use a new corner. By the fourth corner, the first should be nearly empty.
Pro Tip: Freeze scraps overnight before feeding. It kills hitchhiking fruit fly eggs and softens the food so worms eat it sooner.
Harvesting Worm Castings for Your Houseplants
After three to six months, the bedding turns dark and crumbly, with few recognizable scraps. That’s finished compost. Harvest when about two-thirds of the bin has transformed.
Mix castings into potting mix at roughly 1 part to 4 parts for compost for containers. You can also top-dress pots with a thin layer, especially if you’re planning balcony garden ideas with lots of planters.
Real Example: My first harvest came at month five. I mixed one part castings with four parts potting mix for an 8-inch pot of basil, and it was visibly bushier by midsummer.
The Light-Migration Harvesting Method
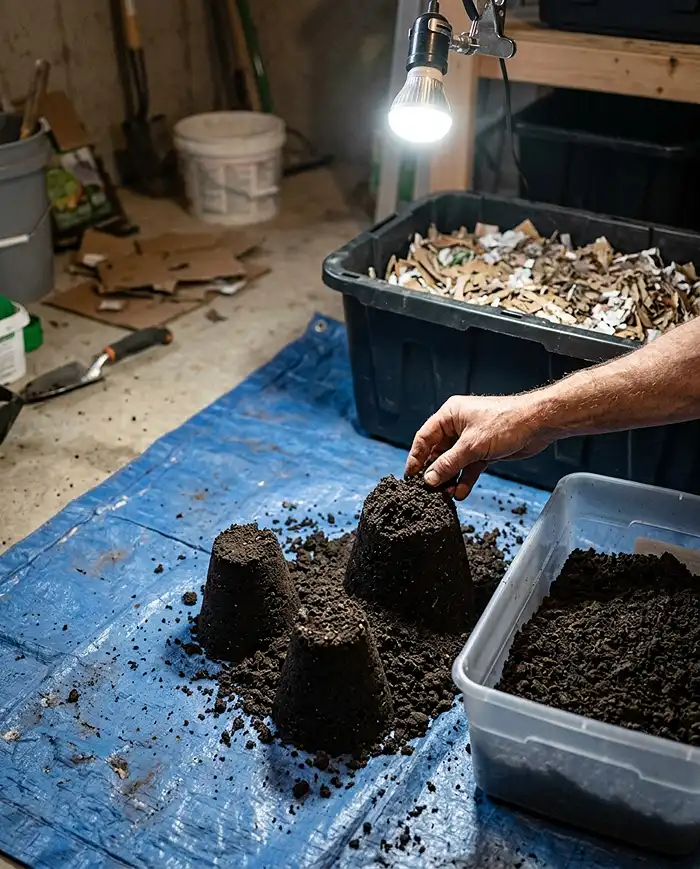
Quick Answer: Dump the bin onto a tarp under a bright light, shape it into small cones, and scrape off the top layer of castings every few minutes. Worms retreat from light, so they sink deeper while you collect finished compost.
- Spread a tarp or old shower curtain on the floor and set up a bright lamp.
- Dump the bin and shape the contents into five or six small cones.
- Wait 10 minutes, then scrape castings off the cone tops.
- Repeat until only a clump of worms remains in the center.
- Return the worms to fresh, damp bedding and start feeding again.
Common Problems & Solutions
Almost every worm bin problem traces back to too much food or too much moisture. Here are the three issues apartment composters run into most.
Foul Odors and Anaerobic Sludge
Quick Answer: A rotting smell means overfeeding or poor drainage. Stop feeding, mix in dry shredded paper to absorb moisture, and gently fluff the bedding so air reaches the bottom. Most bins recover within a week or two.
Real Example: One summer I dumped in a whole cantaloupe rind plus a pile of orange peels. Four days later the bin smelled like a dumpster. I paused feeding for ten days, added dry cardboard, and it recovered.
Overfeeding tops the list of common apartment gardening mistakes for beginners too. When in doubt, feed less.
Fruit Flies and Fungus Gnats
Quick Answer: Fruit flies appear when food is exposed or buried too shallowly. Keep a strict 2-inch layer of dry bedding on the surface and set an apple cider vinegar trap next to the bin.
Fill a small jar with an inch of apple cider vinegar and a drop of dish soap. Cover it with plastic wrap poked with small holes. Flies get in but can’t get out.
Fungus gnats [tiny dark flying pests] come from overly wet bedding. Add dry shreds and the trap handles the rest.
Worm Escapees Crawling Up the Sides
A few worms exploring the walls the first night or two is normal. A mass exodus is different and signals acidic, soggy, or toxic conditions.
Stop feeding citrus or anything acidic, sprinkle in a handful of crushed eggshells, and leave a light on over the open bin. The light pushes worms back down. Check moisture too.
Frequently Asked Questions
Will an indoor worm bin make my apartment smell bad?
No. A healthy, properly maintained worm bin smells like a forest floor after spring rain. Garbage smells mean overfeeding, too much moisture, or banned foods like meat and dairy. Fix it by pausing feeding and adding dry shredded paper.
How long does it take to get usable worm castings?
A brand-new bin typically takes 3 to 6 months to produce a harvestable amount of finished compost. Starting with more worms and chopping scraps small speeds things up.
Can I leave my worm bin unattended while on vacation?
Yes. Established worm bins handle 2 to 3 weeks alone. Before leaving, feed a slightly larger portion buried under bedding and add extra damp bedding on top. Keep the bin in its cool, dark spot.
How many worms do I need to start a worm bin?
Start with half a pound of red wigglers for a small tote or one pound for a larger bin. A pound is about 1,000 worms and can process roughly 3 to 5 pounds of scraps weekly once established.
Do I need to feed my worms every day?
No. Feed every few days, only when the last batch is mostly gone. Overfeeding causes more problems than underfeeding. In a brand-new bin, wait about a week between the first feedings.
Final Thoughts and Key Takeaways
Apartment worm composting is quieter, cheaper, and easier than most people expect. Set up the bin right, feed lightly, and the worms do the rest.
- Use a dark, opaque bin with ventilation holes, kept between 55°F and 77°F.
- Buy red wigglers (Eisenia fetida), never garden earthworms.
- Keep bedding as damp as a wrung-out sponge and feed in small pockets.
- Avoid citrus, onions, meat, dairy, and oils to prevent odors and pests.
- Harvest castings after 3 to 6 months for houseplants and container plants.